On this page
Models that contain NURBS data can be re-tessellated directly in the scene without having to import the model all over again.
What Does the Tool do?
The ![]() Re-Tessellate tool enables you to fine-tune tessellation quality of entire models or individual parts in your scene.
Re-Tessellate tool enables you to fine-tune tessellation quality of entire models or individual parts in your scene.
Increasing the tessellation value will yield smoother surfaces on your model, but also increase scene file size.
How to Re-Tessellate
- Launch the Re-Tessellate tool
The Tesselation tool can be launched either from the Tools Section in the Ribbon, or via right-click on a model, part, or multi-selection of parts in the scene tree or Real-time view. If nothing has been selected when you launch the tool, a selection dialog will appear. Here you can select the part you want to alter in the list or by clicking in the Real-time View, which will highlight the part in the list.
- Adjust the Tessellation quality
Increase will make the surface smoother and a decrease will make the scene faster, as the it will contain fewer triangles.- Distance Tolerance: The maximum allowed distance deviation – expressed as a percentage of the model’s bounding box – measured from any triangle to the actual NURBS surface. A lower value with yield smooth surfaces.
- Angle Tolerance: The maximum allowed angle measurement between adjacent triangles on your model’s surface.
- Maximum edge: The maximum allowed distance deviation – expressed as a percentage of the model’s bounding box – measured from any triangle to the actual NURBS surface. A lower value with yield smooth surfaces.
- Click Tessellate
In order to see the effect you need to press Tessellate after adjusting the values. Use the Preview settings Wire-frame/Glossy to inspect the effect of the Tessellation in the preview - Click Apply
This will let you view the current tessellation quality in the Real-time View, so you can inspect the effect in context, with the current materials, lighting etc. Notice that at this stage the process can still be canceled, and if you close/cancel the tool now, the tessellation quality will be reverted to the state before the tool was launched - Click Done or Cancel
Click Done to commit the changes to the scene. Cancel will revert all changes and exit the dialog. Notice that once the re-tessellation has been committed, it can be undone with Ctrl/Cmd+z, but as long as the part includes NURBS data, you can always re-tessellate.
Note
In order to Re-Tessellate, you must enable the Import NURBS Data checkbox when importing (More about the Import dialog).
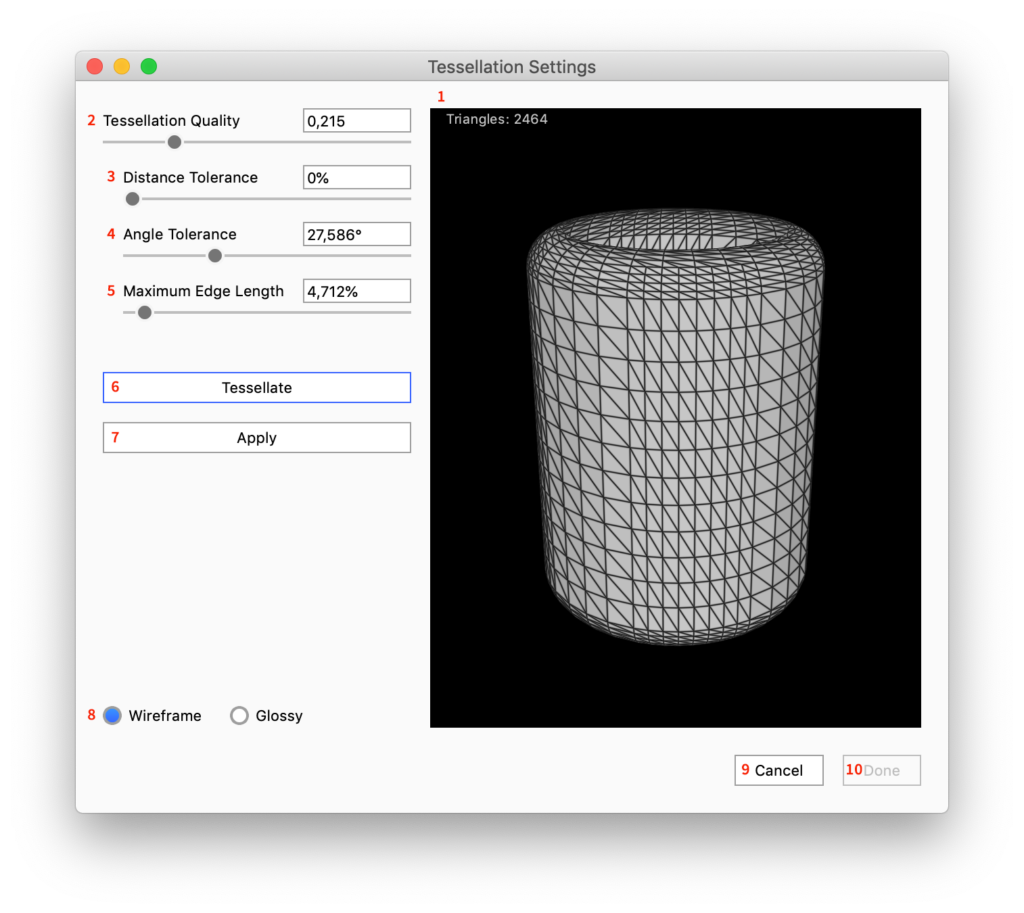
Tool UI

- Tessellation Quality
The quality of your surfaces. A lower value will yield rough surfaces. A higher value will yield smooth surfaces. - Angle Tolerance
The maximum allowed angle measurement between adjacent triangles on your model’s surface. - Distance Tolerance
The maximum allowed distance deviation – expressed as a percentage of the model’s bounding box – measured from any triangle to the actual NURBS surface. A lower value with yield smooth surfaces. - Maximum Edge Length
The maximum side length – expressed as a percentage of the model’s bounding box – for any one triangle on your model’s surface. A lower value will yield smooth surfaces. - Tessellate
Click to make your model appear in the Tessellation Preview at the specified Tessellation Quality.
- Apply
This will apply the current tessellation quality to the Real-time View, so you can inspect the effect in context, with the current materials, lighting etc. Notice that at this stage the process can still be canceled, and if you close/cancel the tool now, the tessellation quality will be reverted to the state before the tool was launched - Tessellation Preview
Shows you a preview of the detail on your model’s surface.- Triangles
Displays the total number of triangles that make up your model’s surface.
- Triangles
- Appearance
Select Wireframe for a polygon view or Glossy to see how smooth the surfaces will look. - Cancel
Click to undo any changes to your model’s tessellation and close the Tessellation Settings window. - Done
Click to accept your changes and apply them to your scene. Note that you cannot undo the changes once you click Done.


