On this page
The CMF (Color, Material, Finish) output option enables you to output a document, containing an image with callouts and a table with Material information.
CMF Output Option
1. Output Type
You can select your preferred output from the drop-down menu.
2. Orientation
You can choose the orientation of the layout in your output document. Landscape will show the image and the table next to each other. In Portrait mode the image will be above the table.
3. Setup Callouts
Clicking on the ![]() will open the Callout editor.
will open the Callout editor.
4. Name
Select the Prefix and Name Template that fits your needs. If the Template includes either the System or Scene Revision # you can reset them here. The Filename shows the full render name generated from the Prefix and the active Name Template. Learn More about Name Templates
5. Folder
Choose where the render will be saved. Unless a specific folder is chosen, it will be saved in your KeyShot Renderings folder.
6. Format
Choose between PNG or JPEG. PNG can include an alpha channel, while selecting JPEG will give you an image quality slider. This will allow you tho control optimization and file size.
Include Alpha (transparency)
If the selected format supports transparency you can choose to include it in your image.
7. Metadata
When this option is enabled a file will be output with your still image. Metadata provides useful reference information including: scene name, Camera name and properties, Environment name and properties, active Model Sets, active Studio, Lighting settings, material names and Render Quality settings.
Click ![]() to select the format of the metadata:
to select the format of the metadata:
- .xmp – This file can be read by any text editor and can also be imported to Adobe applications.
- Simple (.meta) – This file is formatted for easier reading.
Note
Metadata only refers to the reference information mentioned above and not the the output from the Material Information Manager.
7. Resolution
Set the resolution of the render. Type it in or select from the presets.
8. Print Size
If final output is for print quality, enter in the dimensions of the print size as well as the desired DPI. After size has been set, the resolution will update with the correct dimensions.
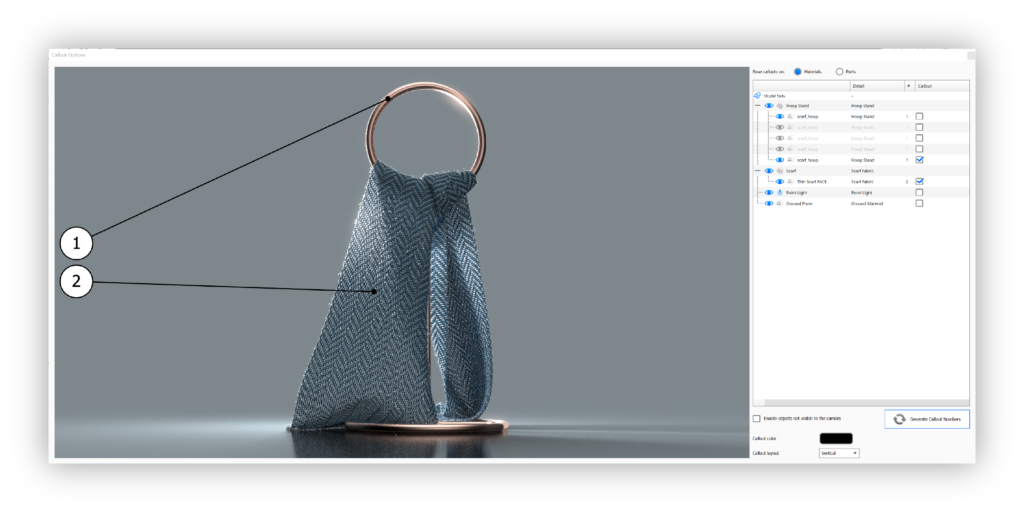
Callout Editor
The Callout Editor enables you to add, edit and manage callouts for your Material Information.
Scene Tree
In the Scene Tree to the right you can choose if you want to base your callouts on materials or on parts, and on which materials/parts you want to have callouts on.
Enable Objects not visible to the camera
This allows you to enable/disable objects in the Scene tree that are not visible to the camera.
Generate Callout Numbers
This will re-generate callout numbers on the materials/parts that have a check mark in the scene tree.
Callout Color
The Callout Color option allows you to customize the color of your callouts.
Callout Layer
The Callout Layer option allows you to choose between a vertical and a horizontal layout.

Output Document
The Output Document is a file, that contains a still image with callouts and a table with the material image, that you specified in the Material Information Manager. You can find the output document in the output folder inside KeyShot > Renderings.


