On this page
Model Sets (Pro feature) allow you to save independent Scene Tree variations in a single .bip file.
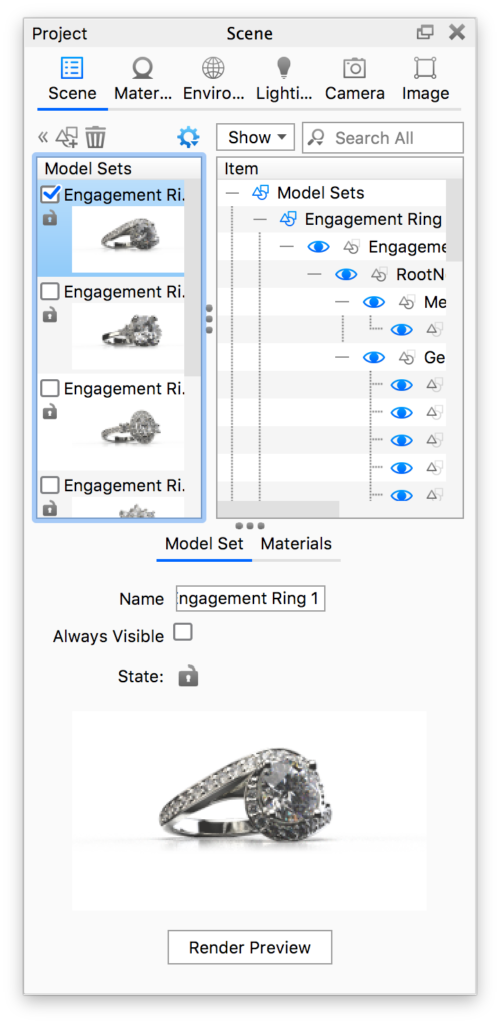
The Model Sets interface is located in the Project > Scene tab as a sidebar on the left side of the panel.
When a Model Set is selected in the sidebar it’s properties will be displayed in the sub-tab below and the contained Models will be listed in the Scene Tree.
- Show/hide Visibility of Model Sets can be toggled via the checkbox in the sidebar or by right-clicking and selecting Make Model Set Active. More than one Model Set can be active at a time.
- Switch Double-clicking a Model Set in the sidebar will make it active and deactivate all others (except Always Visible).
- Lock/Unlock Locking a Model Set will lock all contained models and parts.
- Reorder Model Sets can be reordered by drag-and-drop in the sidebar list.
- Rename Model Sets can be renamed via the right-click menu in the sidebar or in the Model Set properties sub-tab.
- Always Visible Model Sets can be set to Always Visible via the right-click menu in the sidebar or in the Model Set properties sub-tab. This will hide the checkbox in the sidebar. This is mostly useful for staging geometry such as a ground plane or props.

Adding Model Sets
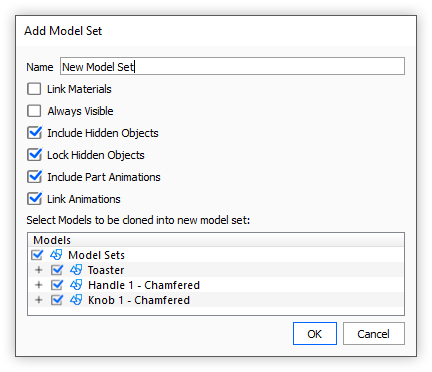
A new Model Set can be added by clicking the ![]() Add Model Set icon above the Model Sets sidebar, which will launch the Add Model Set dialog. Here you can give the new Model Set a name. In the list of Models (in the bottom of the dialog) you select what to clone into the new Model Set and the checkbox options enable you to specify what to include from the selected Model Sets. By default the visible Model Sets will be pre-selected.
Add Model Set icon above the Model Sets sidebar, which will launch the Add Model Set dialog. Here you can give the new Model Set a name. In the list of Models (in the bottom of the dialog) you select what to clone into the new Model Set and the checkbox options enable you to specify what to include from the selected Model Sets. By default the visible Model Sets will be pre-selected.
You can also access this dialog by selecting the models/parts in the Scene Tree you wish to include in the new Model Set > right-click and select Create Model Set from Selection.

Model Set Preview Thumbnails
A preview thumbnail will automatically be generated at the time of creation based on what is currently visible in the Real-time view.
Render Preview: The preview thumbnail can be manually generated at any time by clicking the Render Preview button in the Model Set properties tab, via the right-click menu in the Model Sets sidebar or via the ![]() icon above the Model Sets sidebar.
icon above the Model Sets sidebar.
Thumbnail Size: Also available via the ![]() icon is the ability to select the size of the thumbnails that are displayed in the sidebar or the option to not show them at all.
icon is the ability to select the size of the thumbnails that are displayed in the sidebar or the option to not show them at all.
Thumbnail Render Settings:
- Samples: number of samples used to render the thumbnails and enable
- Center and Fit: If you wish to use the current camera for the thumbnail preview make sure Center and Fit is disabled.
- Render High Res: If you are using the Configurator and wish to display your Model variation thumbnails larger than 256px you will have to select Thumbnail Render Settings from the settings drop-down menu and enable “Render High Res“.


