On this page
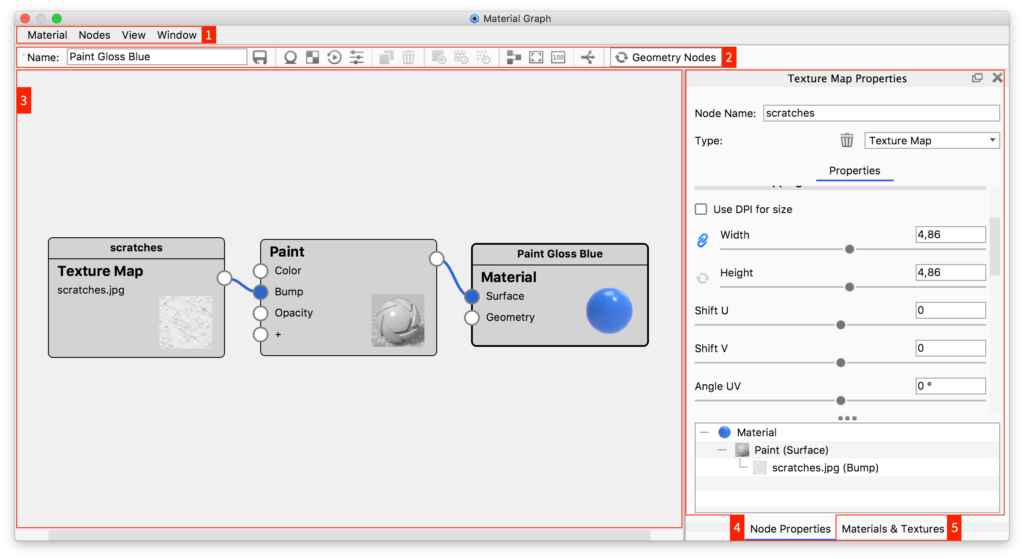
There are five components of the Material Graph window: Menu bar, Ribbon, Materials & Textures Library, Material Properties, and the Work Area.
1. Material Graph Menu Bar
Material
- New This will replace the working material and any textures with a basic diffuse material to start from scratch.
- New Measured Paint This will let you define a Measured Paint material and add the Paint node to the Material’s Surface socket.
- Save to Library will save the working material to the specified folder in your Material Library.
Nodes
This provides quick addition of nodes to the Work Area.
View
- Align nodes This automatically arranges connected nodes in the Work Area.
- Zoom With complex materials, the Work Area can quickly get crowded – the zoom options allow you to quickly adapt the Work Area to your current material.
- Preview Options for previewing individual node settings such as color, alpha, and bump in the Real-Time. You can also stop the preview within this menu as well.
- Save Graph Screenshot Will save a PNG of the nodes in the current material, to your selected location.
Window
This gives access to hide/show the Material Properties window (4), Materials & Textures Library (5), and the Material Graph Ribbon (2).
2. Material Graph Ribbon
![]() Save to Library – saves the current material to your Material Library
Save to Library – saves the current material to your Material Library
![]() Add material node – adds a Plastic material node. The new node will be the default node of the category – you can easily switch the node to another type of the same category in the Material Properties window.
Add material node – adds a Plastic material node. The new node will be the default node of the category – you can easily switch the node to another type of the same category in the Material Properties window.
![]() Add Texture node – adds a traditional texture map and opens the file browser window to select your image file.
Add Texture node – adds a traditional texture map and opens the file browser window to select your image file.
![]() Add Animation node – adds a Color Fade node.
Add Animation node – adds a Color Fade node.
![]() Add Utility node – adds a Bump Add node.
Add Utility node – adds a Bump Add node.
![]() Duplicate selected node – adds a duplicate of the currently selected node.
Duplicate selected node – adds a duplicate of the currently selected node.
![]() Delete Selected node – removes the currently selected node from the material.
Delete Selected node – removes the currently selected node from the material.
![]() Preview color – allows you to preview the color channel of the selected node.
Preview color – allows you to preview the color channel of the selected node.
![]() Preview alpha – allows you to preview the alpha channel of the selected node.
Preview alpha – allows you to preview the alpha channel of the selected node.
![]() Preview bump – allows you to preview the bump channel of the selected node.
Preview bump – allows you to preview the bump channel of the selected node.
To activate a preview mode, select a node you would like to preview. After selecting a node, the available preview modes will become selectable. Click on a preview mode to activate it, which will make the selected node red in the Work Area. To disable the preview mode, click on the activated preview mode again on the ribbon.
![]() Align nodes – align the nodes within the Work Area.
Align nodes – align the nodes within the Work Area.
![]() Zoom to fit – fit all the nodes within the Work Area.
Zoom to fit – fit all the nodes within the Work Area.
![]() Zoom to 100% – view the nodes at 100% zoom level.
Zoom to 100% – view the nodes at 100% zoom level.
![]() Create Multi-Material – will convert the current material to/from a Multi-Material.
Create Multi-Material – will convert the current material to/from a Multi-Material.
![]() Refresh Geometry nodes – The geometry shaders (displacement, bubbles, flakes, and fuzz) need to be refreshed before any edits will be visible in the Real-time View.
Refresh Geometry nodes – The geometry shaders (displacement, bubbles, flakes, and fuzz) need to be refreshed before any edits will be visible in the Real-time View.
3. Material Graph Work Area
The Work Area displays all nodes and their connections in a graph view.
In the Work Area you have following options:
- Select a node or connection – left click.
- Select multiple nodes –
- left-click and hold Ctrl (Cmd on Mac) o
- Shift + left-mouse-button drag to use the marquee selection.
- Delete/duplicate node – Right click on a (selection of) node(s) and delete or duplicate.
- Remove/disable connection – right click on the connection and remove/disable/activate.
- Add node – Right click in the Work Area to access the context menu, where you can access the same nodes as those found in the Nodes menu.
- Zoom in or out of the Work Area – Use the middle mouse wheel.
- Move the Work Area – Click and drag the work area to move it around.
4. Material Graph Properties
The Material Properties dialog shows the associated properties for the current node being edited – similar to the Material tab in the Project window but with the option to change node type.
5. Material Graph Libraries
The Materials and Textures Library contains an organized thumbnail display of all the nodes available.


