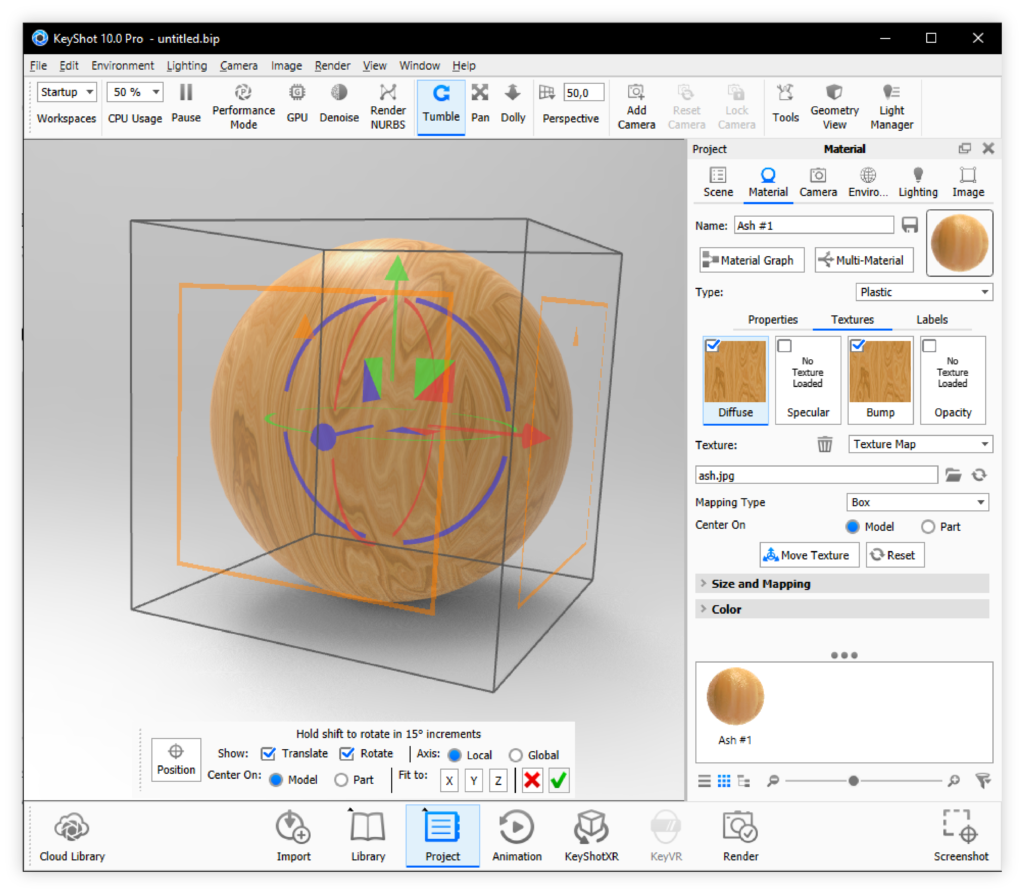
Fine tune the position of textures mapped to your mode with the Move Texture tool. You can access the tool from the texture tab within the material editing menu, and it is available when you are using the Planar, Box, Cylindrical or Spherical mapping modes.
Position
Use this to establish exactly where you want the center of your texture image to project. Once in position mode, you can simply click on the surface of the model to change the where your texture is projecting.
Translate
Use arrow handles to move the texture mapping position on the XYZ axes. To translate the mapping, click on any of the three axis arrows. The red, green and blue arrows correspond to the X, Y and Z axes.
Rotate
Use circle handles to rotate and align the texture mapping to your model. Hold SHIFT to constrain the rotation to 15 degree increments.
Axis
Select if the translation/rotation should use the global or the local axis.
Fit
Fit the texture to match geometry on the X,Y, Z axis.
Center on
- Model – This will position the texture relative to the model.
- Part – This will position the texture relative to the part.
Cancel or Confirm Changes
After adjusting the texture mapping with the mapping tool, click the green check mark to confirm the changes and close the mapping tool. Click the red X to cancel the changes and close the mapping tool.

Tip
Enable the ![]() sync option in the Size and Mapping section to move all your textures on the current material concurrently.
sync option in the Size and Mapping section to move all your textures on the current material concurrently.
Size and mapping
Size and Mapping lets you scale and adjust the orientation of the texture. The parameters wary a little with the Texture Types and Mapping Types but the overall options are the same.

Scale Mode
For scaling, there are three options to choose from, depending on which mapping type is chosen: Scene Units, DPI and UV.
- With Scene units, you will be able to set a width and height in the unit that the scene is set up with.
- With DPI, the size of the texture in the scene is relative to the image size and the DPI set.
- With UV, the size of the texture in the scene is defined by the width and height in UV coordinates
Width and Height
Sets the width and height of the texture using either the scene units or UV coordinates.
Size
If the scale mode is set to DPI, the Width and Height will be replaced by Size instead.
![]() Lock Aspect – Will secure a uniform scale of the texture.
Lock Aspect – Will secure a uniform scale of the texture.![]() Refresh – Will reset to the original aspect ratio of the texture.
Refresh – Will reset to the original aspect ratio of the texture.
Shift U
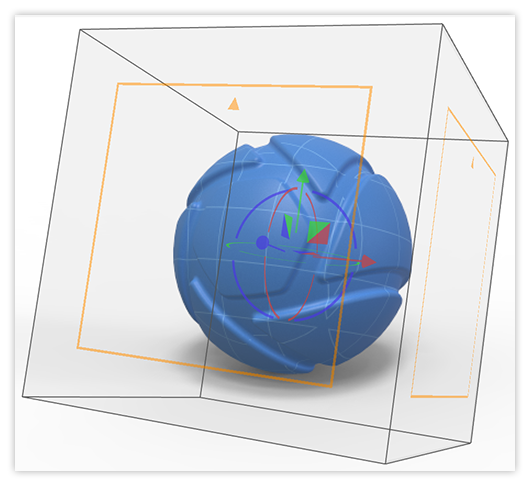
Moves the texture in the U direction. In the example, the UV plane is shown with the orange box, where the V direction is shown with the small arrow. – this means that in the example Shift U will move the texture sideways.
Shift V
Moves the texture in the V direction. In the example Shift V will move the texture up/down.
Angle UV
This will rotate the UV plane (the orange squares in the example to the right) of the Map
Angle
This will rotate the entire map around the local Y axis. This is the same as rotation in the Move Texture tool and means that the entire box will be rotated around the green axis in the example.
Expand the setting for even more precise control.
Axis Tilt
This will tilt the local axes around the Global X axis.
Axis Azimuth
This will rotate the map around the global Y axis
If the tilt is 0 adjusting the azimuth will be the same as adjusting the overall angle.
Center X
Will move the center of the map along the global X axis.
Center Y
Will move the center of the map along the global Y axis.
Center Z
Will move the center of the map along the global Z axis.
![]() Flip Horizontal
Flip Horizontal
Will mirror the texture over the local Y axis.
![]() Flip Vertical
Flip Vertical
Will mirror the texture over the local X axis.
![]() Two Sided
Two Sided
This is only relevant for Planar and Box Mapping and has sightly different behavior for the two.
- Planar: When enabled the texture will be visible on both sides of the model, with a mirrored version on the “backside”.
- Box: when enabled the texture will be mirrored on the back faces of the box, when disabled the texture is the same on all faces.
![]() Repeat Horizontal
Repeat Horizontal
When enabled the texture will be tiled horizontally.
![]() Repeat Vertical
Repeat Vertical
When enabled the texture will be tiled vertically.
![]() Sync
Sync
Textures on this material node with sync enabled will be scaled/moved/adjusted concurrently.
![]() Lock Camera Map
Lock Camera Map
When this is enabled, the texture being camera mapped will be locked in place.