On this page
If you want your computer to serve as Manager on your network you select the Manager Role (or Both Manager and Worker if you also want it to contribute to the rendering force) in the Network Configurator  .
.
Setting up the Manager
Launch the Network Configurator on the computer where you want to set up/edit the manager.
General Settings
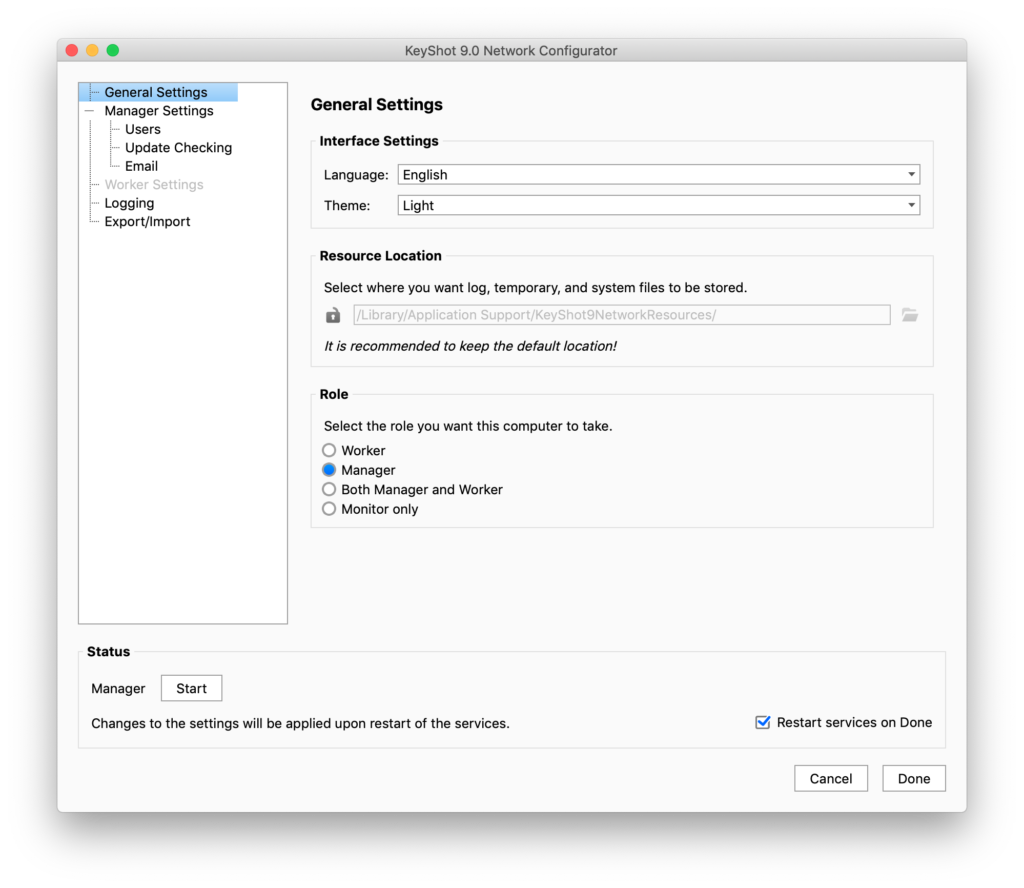
Interface Settings
Select the Language and Theme color both of the Network Configurator and the Monitor
Resources Location
KeyShot Network Rendering creates a Resources folder where it stores log information, system and temporary files.
Default location of the Resources folder:
- On Windows: C:\Users\Public\Public Documents\KeyShot10NetworkResources
- On Mac: /Library/Application Support/KeyShot10NetworkResources
- On linux: /var/local/share/KeyShot10NetworkResources/
If necessary you can change the location of the resources folder, but it is not recommended to do so.
To change the location of the Resource folder click the lock icon to enable editing and browse to the chosen location.
Role
Select the Manager Role. Now the relevant settings for the Manager are available in list in the left of the window.
If you are happy with using the default settings for the manager, you can actually skip the rest and finish the Network configurator here.
Status
The Status panel in the bottom of the window informs you about the current state on the manager, you can start it manually or set it to be restarted automatically when you finish the Network Configuration. If you are editing the settings of a manager that is already running, this will let you know when a restart is necessary
In the Network Configurator you can set up your computer as a Network Rendering Manager.
Manager settings
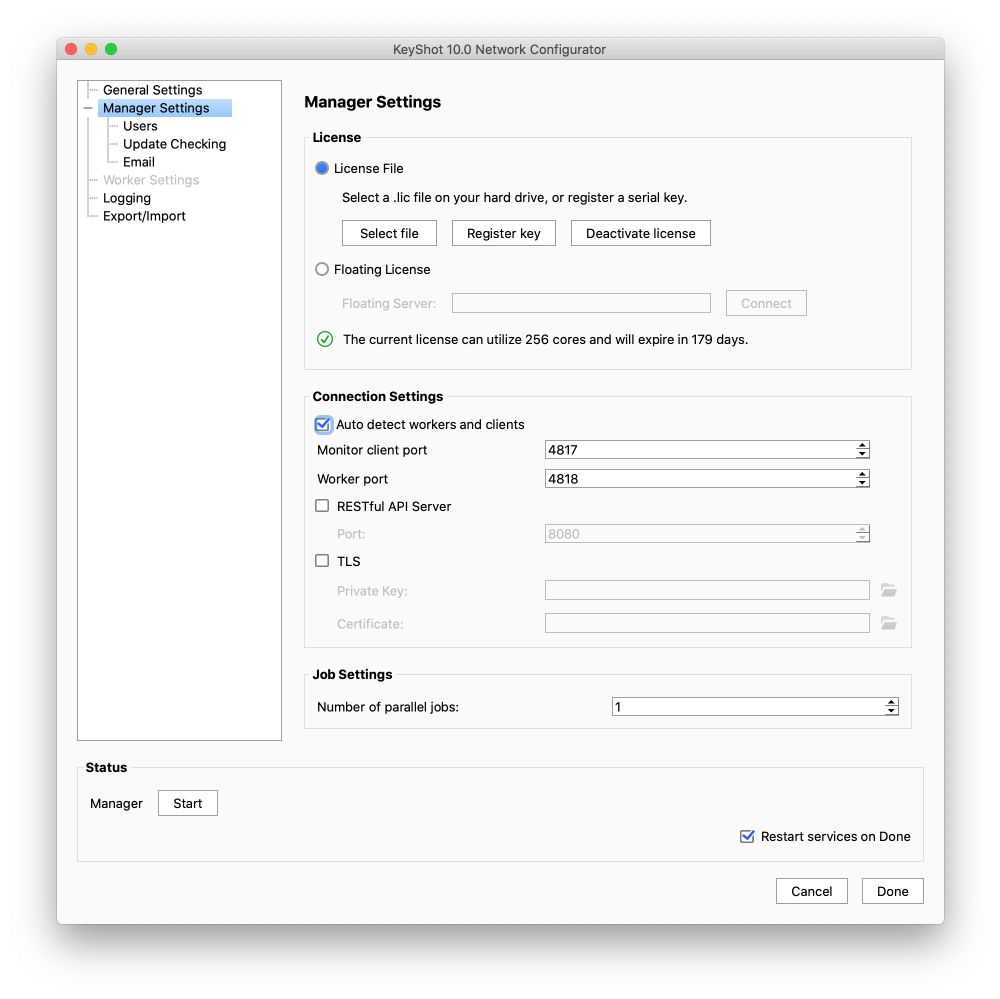
License
You only need a license for the manager, this limits the number of worker cores that can be used at any given time, but it does not limit the number of users that can send jobs to Network Rendering.
There are 2 different types of licenses for Network Rendering
- License File – the license file is located on the computer acting as manager.
- Floating License – the license is handled by a license server which the manager connects to. This is the license type you need if you want to have Multiple Managers on your network.
Visit the License page for a detailed walktrough on setting up the license.
In the bottom of this section you can always see the current state of your license, as well as the cores limit and remaining days on the license.
Connection Settings
- Auto detect workers and clients – When auto detect is enabled, workers and clients on the network will automatically connect to the manager. If not enabled you will need to enter the manager’s IP and port information in their respective connection settings.
- Monitor Client port – the default port for connecting monitors to the manager is 4817
- Worker Port – the default port for connecting workers to the manager is 4818
- RESTful API Server – When enabled you can get info about your Network Rendering setup, as json data.
- Port – Set your custom port, the default is 8080
- TLS – Enable this if you want to encrypt/secure communications between manager and client systems. Visit the Get a TLS certificate page for more information.
Job Settings
The Job Settings enables you to allow multiple jobs to be processed at the same time.
When set to 1, the manager will only start a second job if there is an excess of workers available for the current amount of tasks. This can result in situations where all workers are assigned to one large job, and less heavy jobs are waiting while that job is in progress. With parallel jobs the Manager will be able to start multiple jobs – making everything flow more smoothly. The individual jobs may have longer render times, but the overall queue will be processed faster.
Users
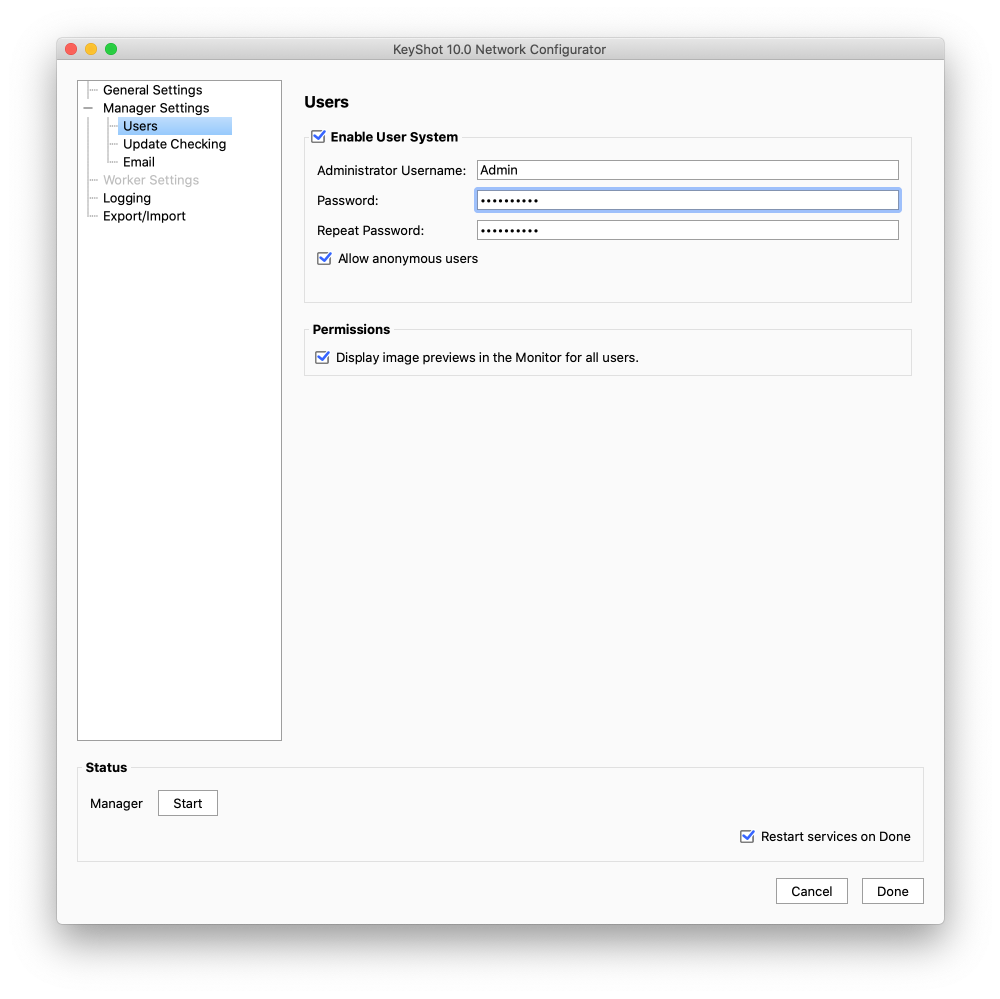
Enable user system
The User System enables you to control who can see/access what in the Monitor.
- Admin username/password – You need to set up an admin user for when User System is enabled on the manager. The Admin will be able to create Users in the Monitor. By managing users, the administrator controls who can submit, download, and/or delete jobs.
- Allow Anonymous Users – when enabled anyone with access to the Network can send jobs to rendering and view the monitor, even if they don’t have a user. Visit the Users page for more info.
Permissions
In addition to the User System you can set up limits to the content that is shown in the Monitor.
- Display image previews in the Monitor for all users – when enabled, everyone can see the image preview of a finished job. Otherwise it will only be visible to the owner of the job and users with permission to download jobs.
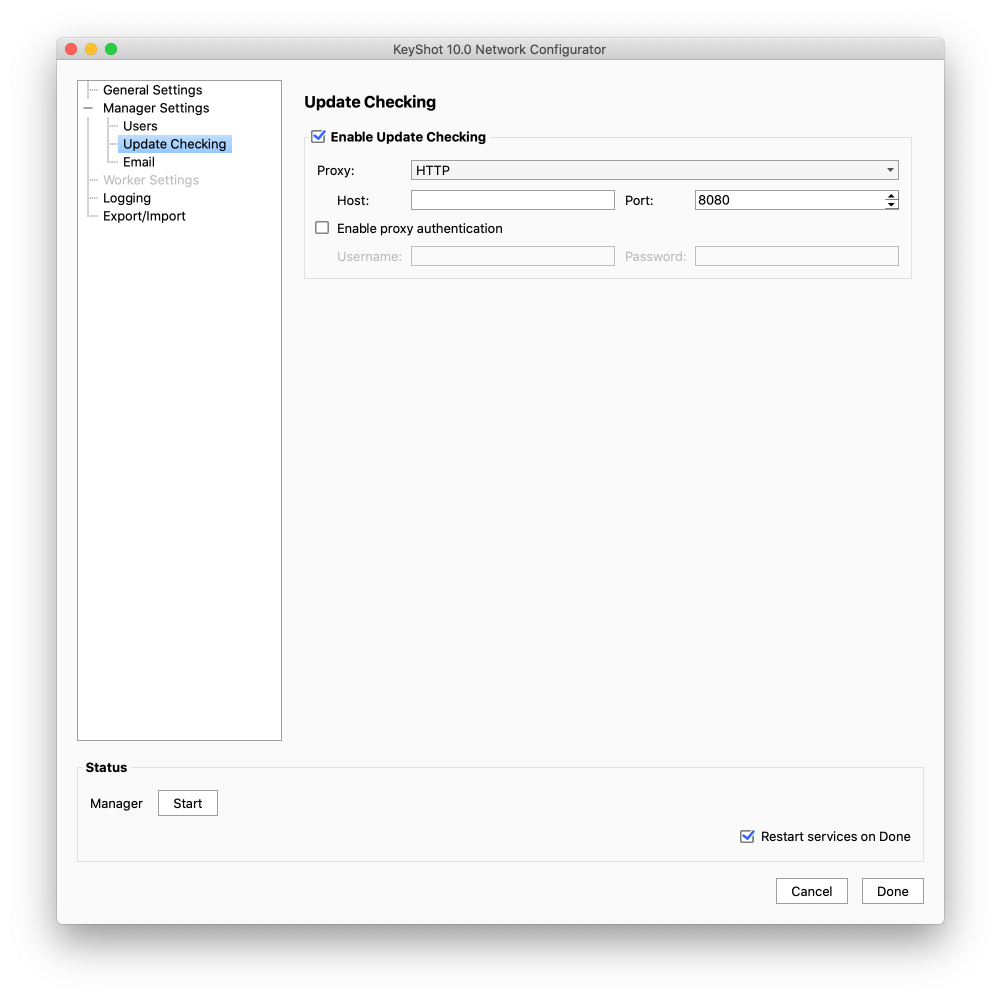
Update Checking
When Update Checking is enabled, the Monitor will check online for software updates every time it is launched, or when you log on to your computer. This setting is enabled by default.
- Proxy: Select the type of proxy you want to use:
- No proxy/Automatic proxy detection – you don’t need to enter anything further.
- HTTP/SOCKS v5 – Enter host and port. 8080 is the default port.
- Enable proxy authentication – enable this if your setup requires authentication.
- Username/password – Enter the username and password for the proxy authentication.
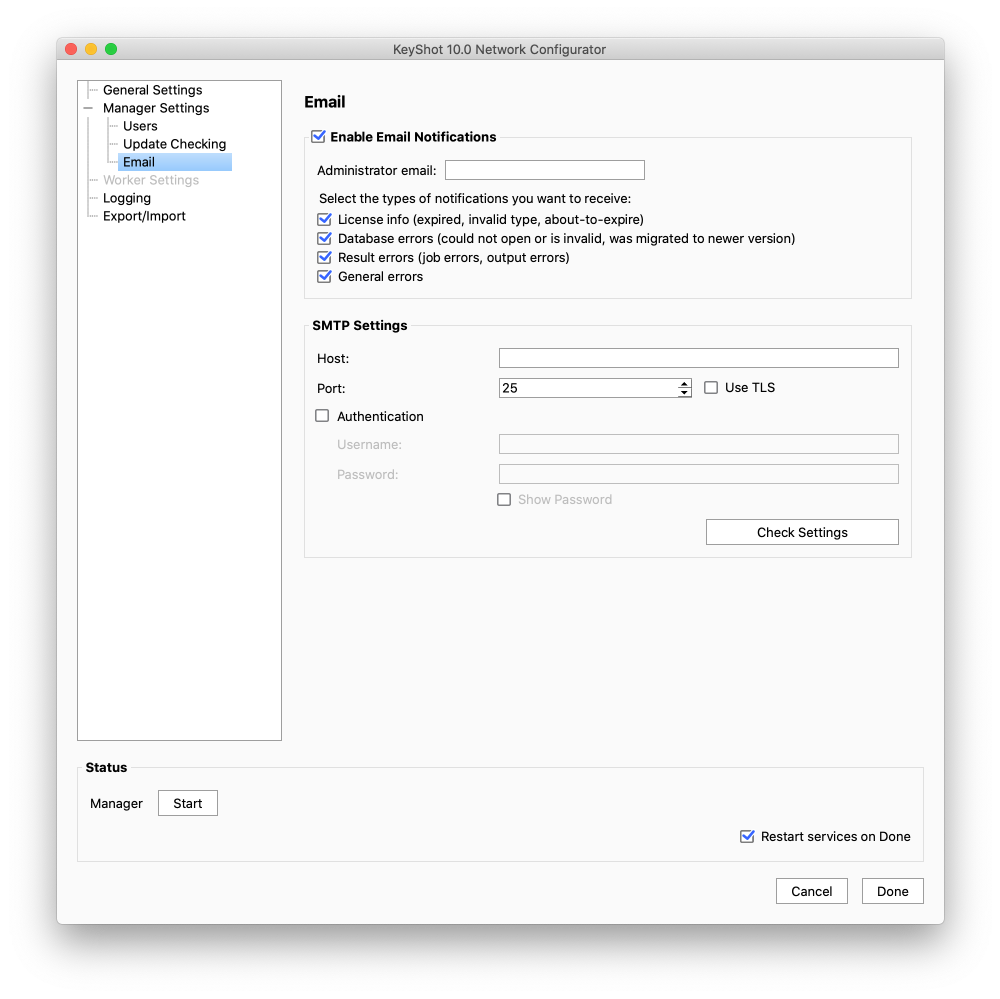
Enable email notifications
When email notifications are enabled Network rendering will notify the admin email in the selected situations.
Users who have entered their email in the account settings (in the monitor) will receive an email when a job is completed.
SMTP Settings
In order for the email notifications to work you need to connect a mail account for the outgoing mail
- Host/Port – Fill in Host and Mail Client Port. You can find this information in your email client settings.
- TLS – You can enable TLS/SSL or leave it unchecked. If you do enable it, make sure to use ports 465 or 587.
- Authentication – Enable and fill in your username and password for the outgoing mail.
- Check settings – The Configurator will check your email settings and provide you with a confirmation message.
Please consult your IT department for any troubleshooting when setting up SMTP.
Logging
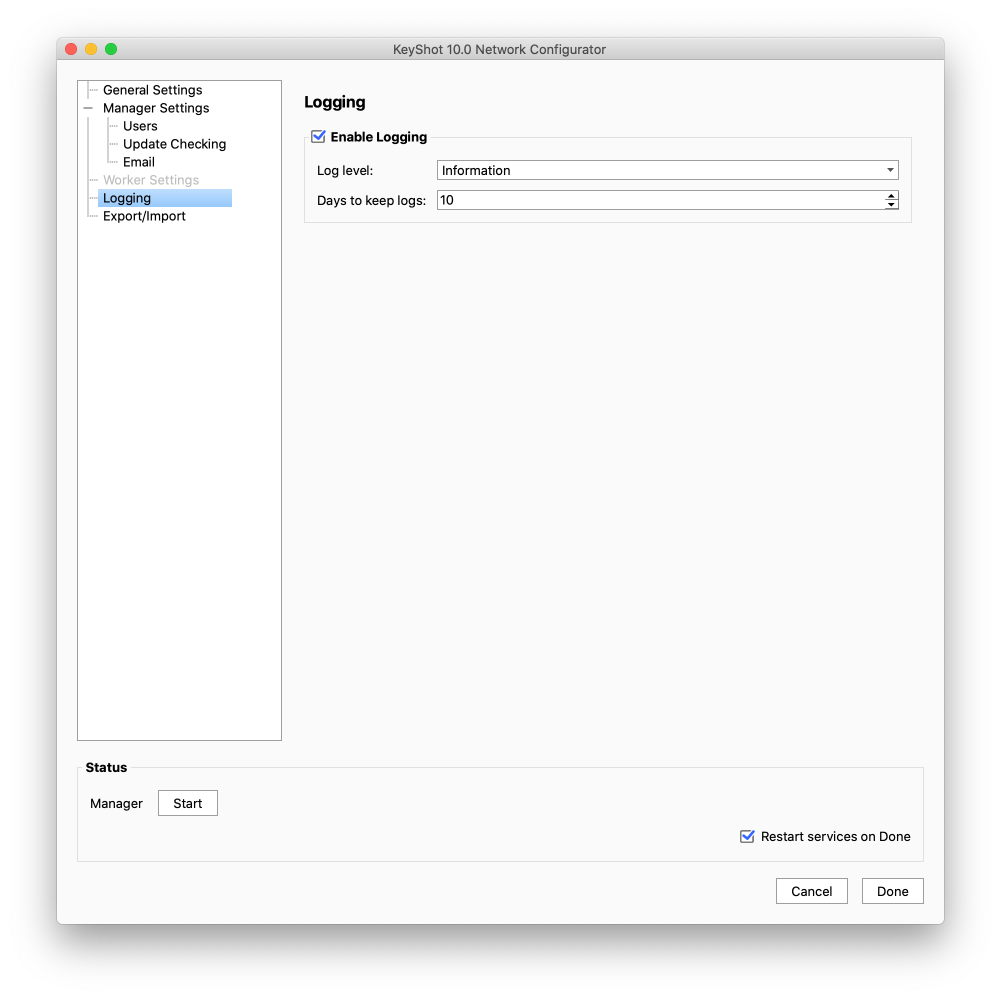
The log files keep track of Network Rendering state, information, and potential errors. If you enable logging on your manager you can select which incidents you want logged and how long to keep the logs. The Logs will be stored in the Resources folder (as set in the general settings). And they can be viewed in the Monitor
. To enable logging, click on “logging” in the KeyShot Network Configurator and check the “Enable logging” option.
- Log Level – Choose at what level to record logs from: (Choosing a higher log level will record all other log levels below it)
- Trace – shows all types of log messages.
- Information – no trace but shows warnings, errors, and fatals.
- Warning – no trace and information, but shows warnings, errors, and fatals.
- Critical – no trace, information, and warnings, but shows errors and fatals.
- Fatal – no trace, information, warnings, and errors, but shows fatals.
- Days to keep logs – Set a cutoff time for saved logs. Any logs that pass the set time frame will be deleted.
Export/import
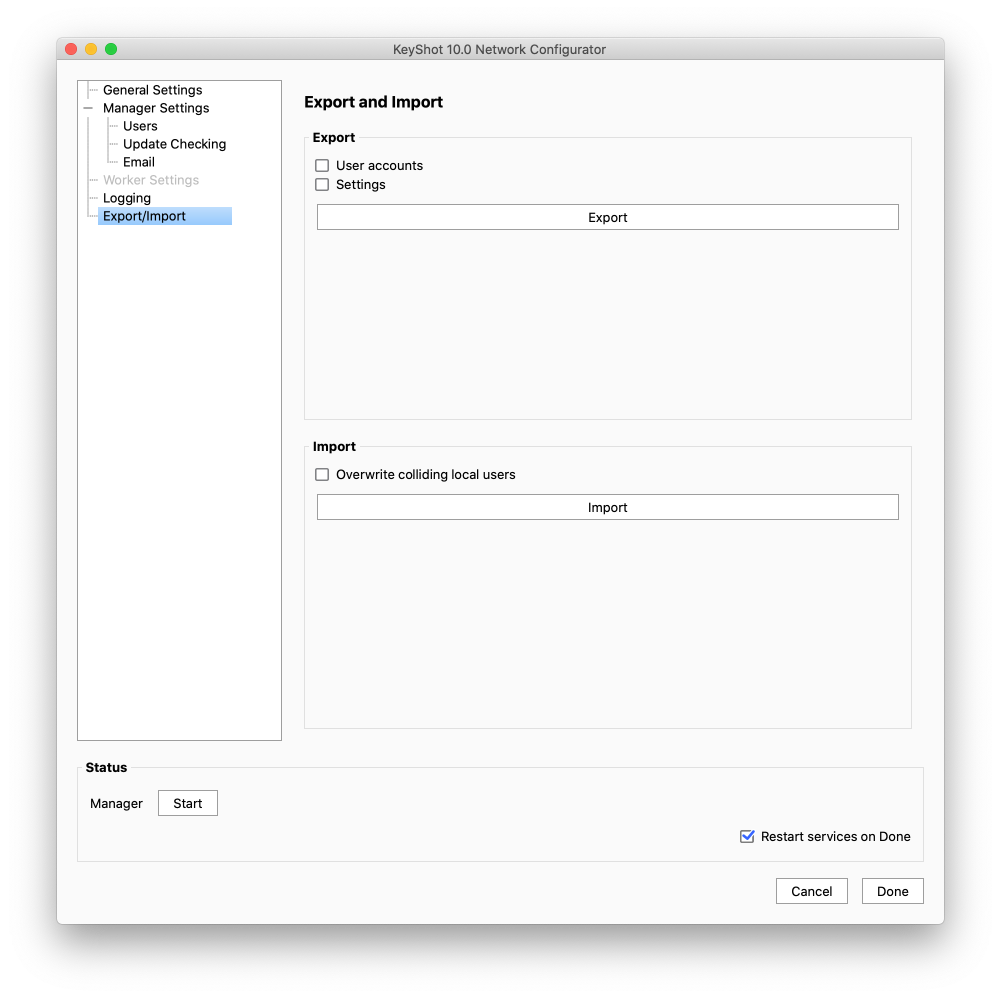
If you need to move your Network Rendering installation or simply want to reuse your current settings when upgrading, you can export User Accounts and/or Settings and import them on the new computer.
- Export – Select what to export, press export and select a location for the exported zip file.
- User Accounts: When enabled the export will include all user accounts on the manager. This includes username, privileges and email – no job history will be exported.
- Settings: When enabled the export will include the network configurator settings as well as any worker schedules that have been created while connected to the manager.
- Import – Press import and select the .zip file. Notice that the location of the Resources folder will not be applied from the imported settings. If you have enabled User System before importing, the local admin will remain as the “super administrator” of the Manager, the imported admin will be created as a regular user, with admin privileges (or, if they have the same username, it will be discarded).
- Overwrite colliding local users – If there are already users on the manager you are importing to, you can select whether or not to overwrite the ones that have the same username. When enabled it will overwrite the current user with the settings and mail from the imported. When unchecked, it will skip the ones in the import file.
Note
The export will include the settings currently running on the manager. If you have made changes to the Network Configurator Settings you need to restart the configurator before exporting.